
例: Devastator タンク
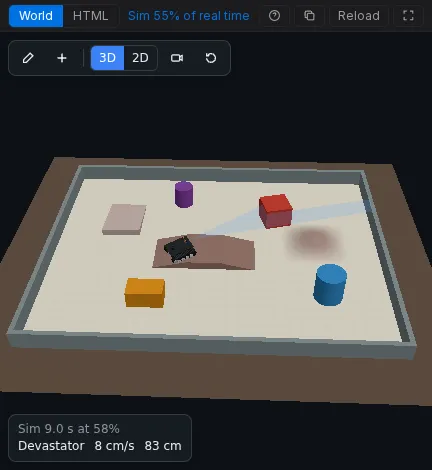
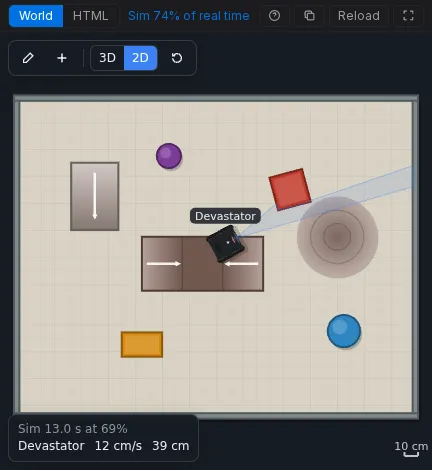
Romeo BLE 上の DFRobot Devastator タンクは、DFRobot 自身の障害物回避サンプルを実行します。サーボに搭載された URM37 が 35 cm 未満を検出するまで前進し、右と左を見て、後退し、より広い方へ向きを変えます。World は、シーンキットで作成された正方形と円形の障害物、橋、丘、ランプのあるアリーナなので、マウスで編集できます。
開く: velxio.dev/example/dfrobot-devastator-tank-avoidance で Run を押します。
| Id | パーツ |
|---|---|
dfrobot-romeo-ble |
DFRobot Romeo BLE (オンボードに 2 つのモーターチャンネル) |
motorL, motorR |
エンコーダ付きギアモーター、45:1 |
servo1 |
ソナーを回転させるサーボ |
urm37 |
DFRobot URM37 V5.0 超音波、PWM モード |
| 接続元 | 接続先 (Romeo BLE) |
|---|---|
motorL M1 / M2 |
M1+ / M1- |
motorR M1 / M2 |
M2+ / M2- |
servo1 PWM / V+ / GND |
D10 / 5V / GND |
urm37 ECHO |
D8 |
urm37 TRIG (COMP/TRIG) |
D9 |
urm37 VCC / GND |
5V / GND |
ファームウェア
Section titled “ファームウェア”スケッチは Devastator 用の DFRobot のサンプル (Avoidance_URM37.ino、Gavin 作、2015 年) で、含まれる 2 つのライブラリ DFMobile と URM37 をプロジェクトのファイルとして含んでいます。プロジェクトのコピーで変更されたのは 2 点だけです: 改行コード、そしてライブラリがスケッチの隣に同梱されているため include が引用符を使用していることです。以下のリストは DFRobot のコメントを短縮しています。
#include "DFMobile.h"DFMobile Robot (4,5,7,6);   // left dir D4 / PWM D5, right dir D7 / PWM D6
#include<Servo.h>Servo myservo;
#include "URM37.h"ultrasonic URM37;double distance;int i=0;int distanceBuffer[3];
void setup(){  myservo.attach(10);  Robot.Direction(LOW,HIGH);   // (left direction, right direction)  Serial.begin (115200);  URM37.Init(8,9);             // ECHO on D8, COMP/TRIG on D9}
void loop(){  myservo.write(90);           // look ahead  Robot.Speed(80,80);          // forward  Measurement();
  if(distance < 35){    Robot.Speed (0,0);         // stop    myservo.write(0);          // look right    Measurement();    delay(200);    double degree_0 = distance;    delay(50);    myservo.write(180);        // look left    Measurement();    delay(200);    double degree_180 = distance;    delay(50);
    if(degree_0 > degree_180){      Robot.Speed(-200,-200);  // back off      delay(50);      Robot.Speed(200,-200);   // turn right      delay(200);    }    else{      Robot.Speed(-200,-200);  // back off      delay(50);      Robot.Speed(-200,200);   // turn left      delay(200);    }  }  else{    myservo.write(90);    Robot.Speed (100,100);     // forward  }}
void Measurement(){  distanceBuffer[i] = URM37.Distance();  i++;  if(i>2){    i=0;  }  // the largest of the last three readings  distance = distanceBuffer[0]>distanceBuffer[1] && distanceBuffer[0]>distanceBuffer[2]?distanceBuffer[0]:(distanceBuffer[1]>distanceBuffer[2]?distanceBuffer[1]:distanceBuffer[2]);  Serial.print(distance);  Serial.println (" cm");  delay (100);}
Robot.Direction(LOW, HIGH) は、実際のシャーシがモーターをミラーリングして取り付けているため、両側で「前進」を LOW の方向レベルにします。World はタンクの両側で Reverse (invertLeft と invertRight) を指定してこれを表現しているので、スケッチは DFRobot のものとまったく同じままです。
シーン (world.html 内、Edit で編集可能):
{ "version": 1, "view": "3d", "floor": { "w": 3.0, "h": 2.4, "color": "#d8d2c4", "grid": true }, "objects": [ { "id": "wallN", "type": "wall", "x": 0, "y": 1.18, "rot": 0, "w": 3.0, "d": 0.04, "h": 0.15, "color": "#7f8c8d" }, { "id": "wallS", "type": "wall", "x": 0, "y": -1.18, "rot": 0, "w": 3.0, "d": 0.04, "h": 0.15, "color": "#7f8c8d" }, { "id": "wallE", "type": "wall", "x": 1.48, "y": 0, "rot": 90, "w": 2.32, "d": 0.04, "h": 0.15, "color": "#7f8c8d" }, { "id": "wallW", "type": "wall", "x": -1.48, "y": 0, "rot": 90, "w": 2.32, "d": 0.04, "h": 0.15, "color": "#7f8c8d" }, { "id": "box1", "type": "box", "x": 0.55, "y": 0.5, "rot": 15, "w": 0.25, "d": 0.25, "h": 0.2, "color": "#c0392b" }, { "id": "box2", "type": "box", "x": -0.55, "y": -0.65, "rot": 0, "w": 0.3, "d": 0.18, "h": 0.15, "color": "#d68910" }, { "id": "cyl1", "type": "cylinder", "x": 0.95, "y": -0.55, "r": 0.12, "h": 0.25, "color": "#2e86c1" }, { "id": "cyl2", "type": "cylinder", "x": -0.35, "y": 0.75, "r": 0.09, "h": 0.2, "color": "#7d3c98" }, { "id": "bridge1", "type": "ramp", "profile": "bridge", "x": -0.1, "y": -0.05, "rot": 0, "w": 0.9, "d": 0.4, "h": 0.07, "color": "#8d6e63" }, { "id": "hill1", "type": "ramp", "profile": "hill", "x": 0.9, "y": 0.15, "rot": 0, "w": 0.6, "d": 0.6, "h": 0.06, "color": "#a1887f" }, { "id": "ramp1", "type": "ramp", "profile": "wedge", "x": -0.9, "y": 0.45, "rot": -90, "w": 0.5, "d": 0.35, "h": 0.06, "color": "#bcaaa4" }, { "id": "tank1", "type": "robot", "preset": "tank", "label": "Devastator", "x": -1.05, "y": -0.3, "rot": 0, "color": "#1f2326", "bind": { "left": ["motorL"], "right": ["motorR"], "invertLeft": true, "invertRight": true, "sonar": "urm37", "sonarServo": "servo1" } } ] }- URM37 はサーボが向いている方向を見ます:
sonarServoはサーボの角度でソナーを回転させます (0 度が右、90 が前方、180 が左)。 - タンクは最大 3 cm まで登れるので、橋、丘、ランプを走り越え、箱、円柱、壁に当たると停止します。
- 障害物間のすべての隙間は 22 cm のタンクより広いので、閉じ込められることはありません。
次に試すこと
Section titled “次に試すこと”- Edit を押して箱をタンクの進路に移動し、スキャンして向きを変える様子を観察します。
loop()の35を20に変更して、周囲を見回す前にどれだけ近づくかを確認します。- 回路に MPU6050 を追加し、エディタでタンクの IMU としてバインドし、スケッチで回転率を読み取ります。