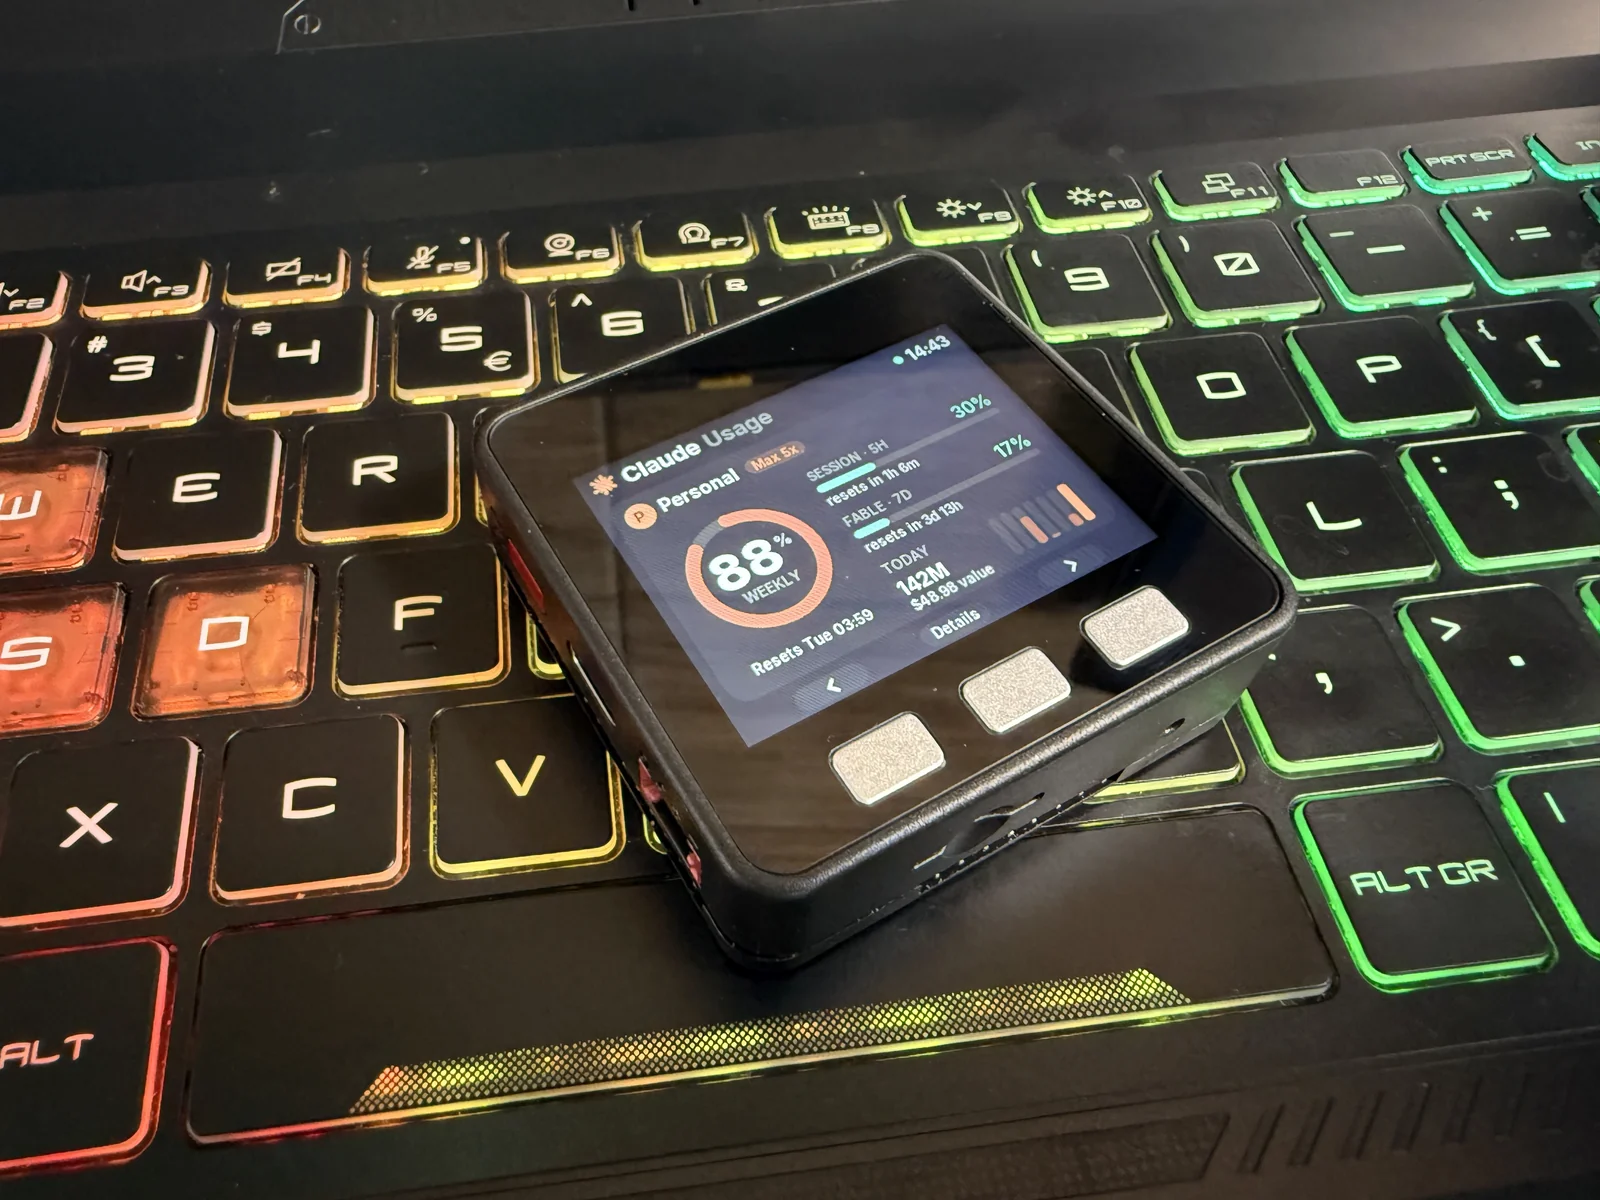
I use Claude every day, and the question I ask most often is not about code. It is “how much of my week is left?” Claude Code’s /usage screen answers it, but only when I stop and type it. I wanted the answer on my desk, the way a clock shows the time.
The M5Stack Basic is a good fit. It is a finished device: a 2-inch 320×240 screen, three buttons, a battery and an ESP32 in a 54 mm case. No breadboard, no soldering.
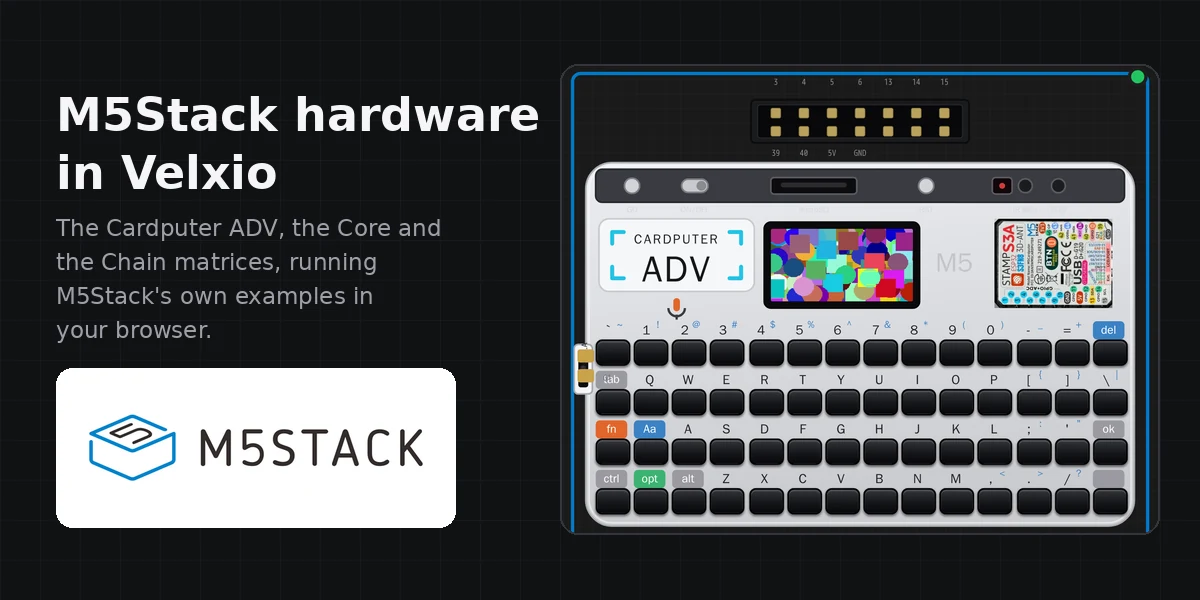
This article describes the dashboard: what it shows, how the data gets from Claude to the screen, how the device connects without any setup, and the steps to build your own. The UI was designed on the M5Stack Core in Velxio before it touched the hardware, and that is the route I recommend if you want to build one. You can also run this firmware in your browser, on demo data, without the device.
The dashboard on the device: watch it on YouTube.
All the code, the firmware and the PC bridge, is on GitHub under the MIT license: velxio/m5claude. The section “The code, part by part” below walks through what each file does.
The hardware
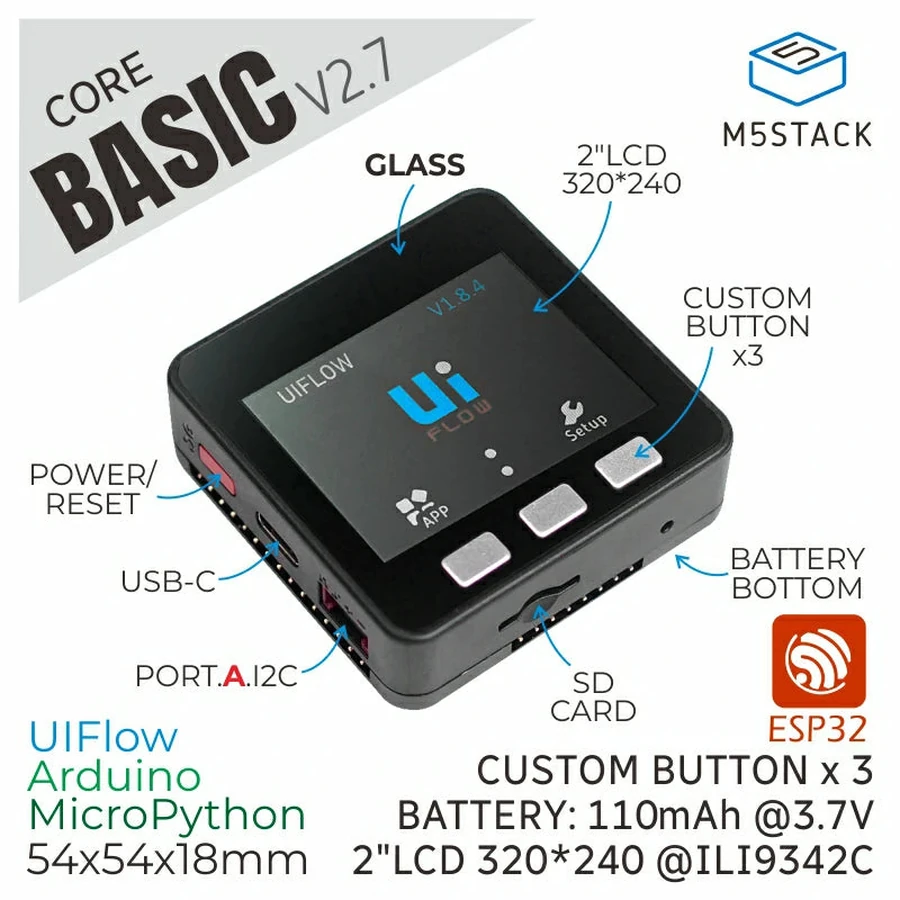
The board is the M5Stack Basic Core IoT Development Kit v2.7:
- ESP32-D0WDQ6-V3, two cores at 240 MHz.
- 520 KB of SRAM and no PSRAM. That constraint shapes the firmware.
- 16 MB of flash.
- A 2-inch 320×240 IPS panel with an ILI9342C controller, behind glass on the v2.7.
- Three buttons (A, B, C) on GPIO 39, 38 and 37.
- A CH9102 USB-to-serial chip, Wi-Fi and Bluetooth LE.
- A 1 W speaker on GPIO 25.
- An IP5306 power chip with a 110 mAh battery, readable over I2C.
Nothing else is needed: the dashboard uses only what is in the case. The board has no IMU, microphone, LEDs or real-time clock, so the dashboard uses everything else: the screen and buttons, the speaker for alerts, the backlight to save battery, and the power chip to show the charge.
What the screen shows
The dashboard works with two kinds of Claude accounts, and with several of each:
- Pro and Max subscriptions. These have usage limits: a 5-hour session window, a weekly limit, and weekly limits per model. The screen shows each one as a percentage with its reset time.
- API organizations. These pay per token, so the screen shows spend instead: today and the last seven days, in dollars.
For both, it shows tokens per day for the last week, split into input, output, cache reads and cache writes, and by model.
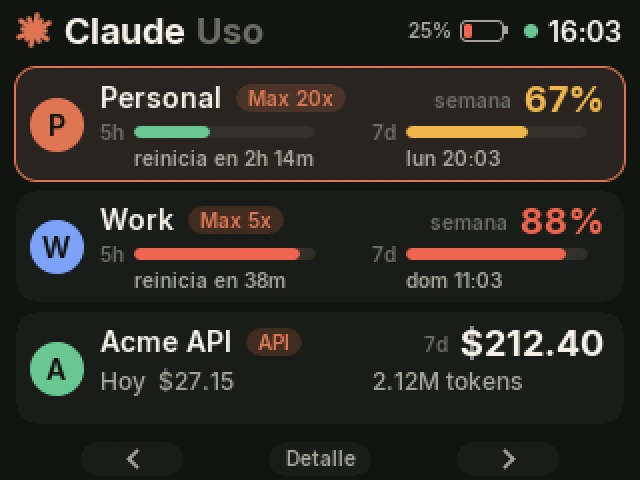
There are four views. B moves to the next one, A and C switch between accounts, holding B asks the PC for fresh data, and holding C opens the settings. This is every screen, with the animation each view plays when it opens:
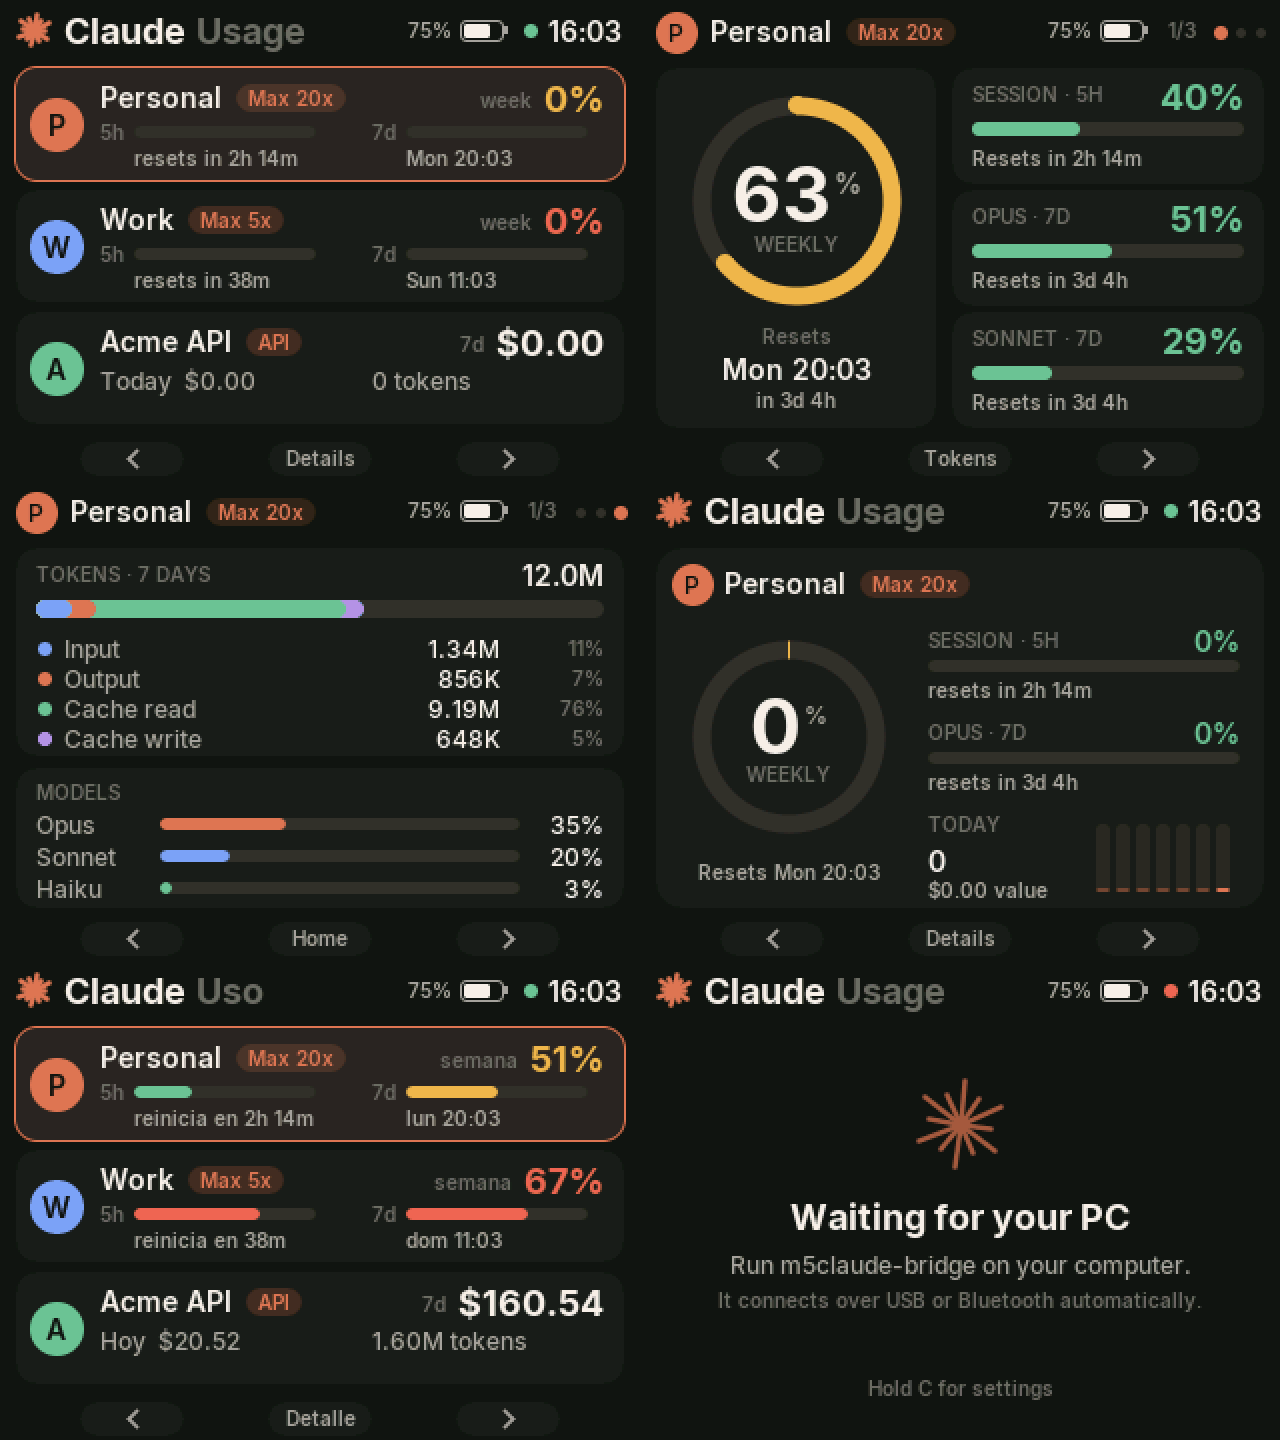
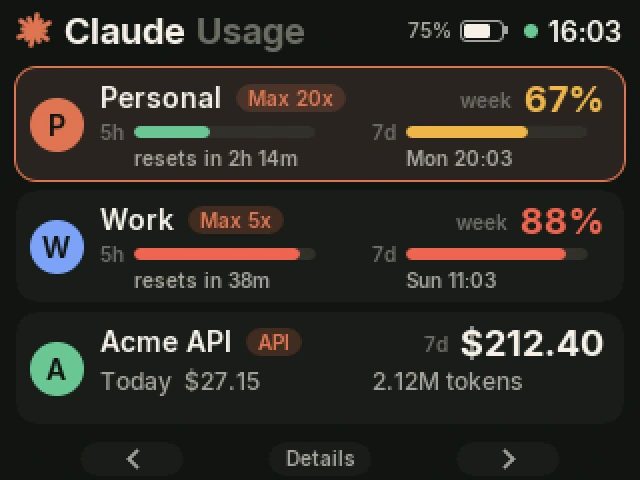
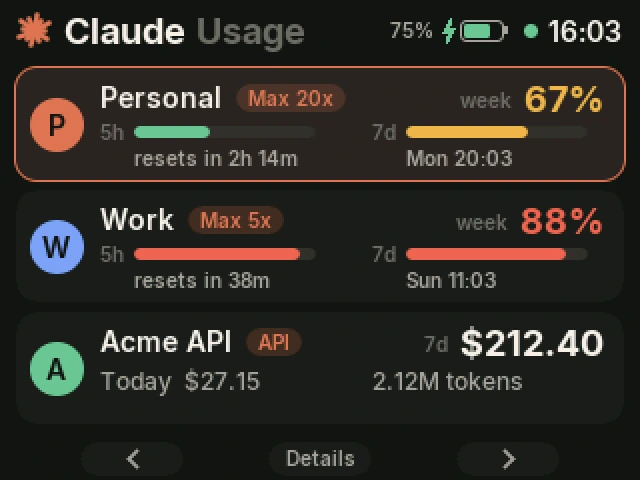
Overview. One card per account. The layout adapts to how many accounts there are: one account fills the screen, two get taller cards with a row for today’s usage, and three or more become a scrolling list.
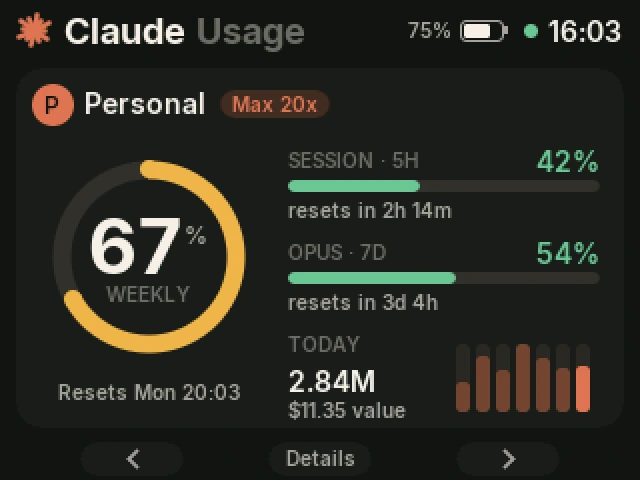
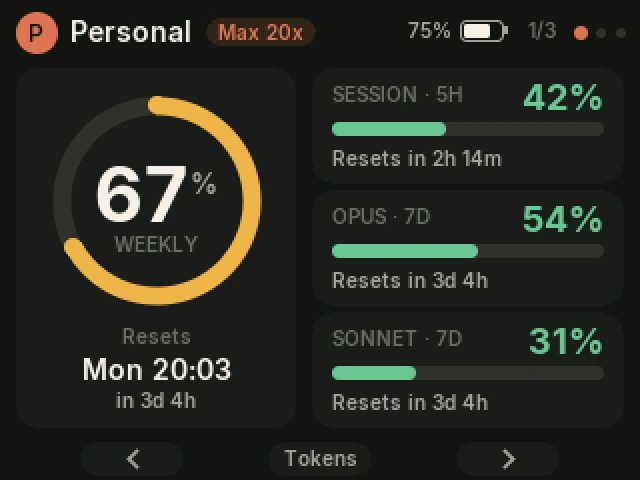
Limits. The weekly limit as a ring, with the session and the per-model limits beside it. The model names come from Claude itself, so the rows follow whatever limits your plan has. Colors change at 60% (amber) and 85% (red).
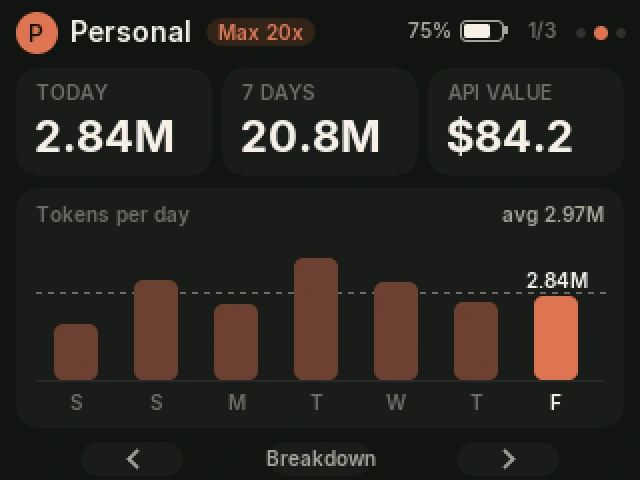
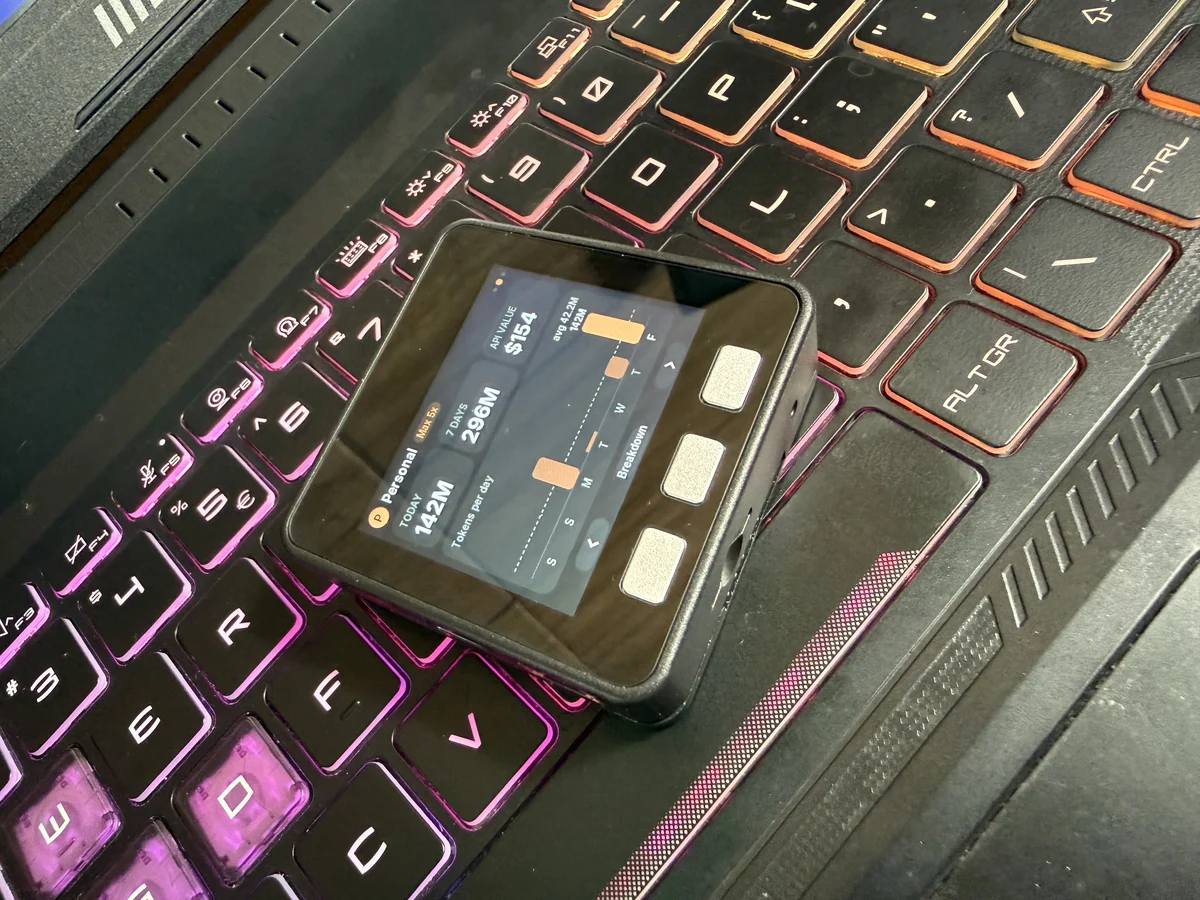
Tokens. Today, the last seven days, and the dollar figure, then tokens per day with a dashed line at the average. For a subscription, the dollar figure is what the same tokens would cost at API list prices. It is not a charge, but it is a useful way to see how heavily you use the plan.
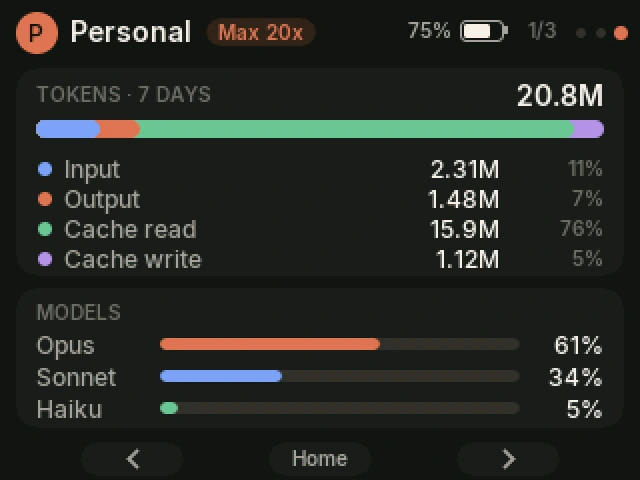
Breakdown. The week’s tokens by type and by model. With Claude Code, cache reads are usually most of the total.
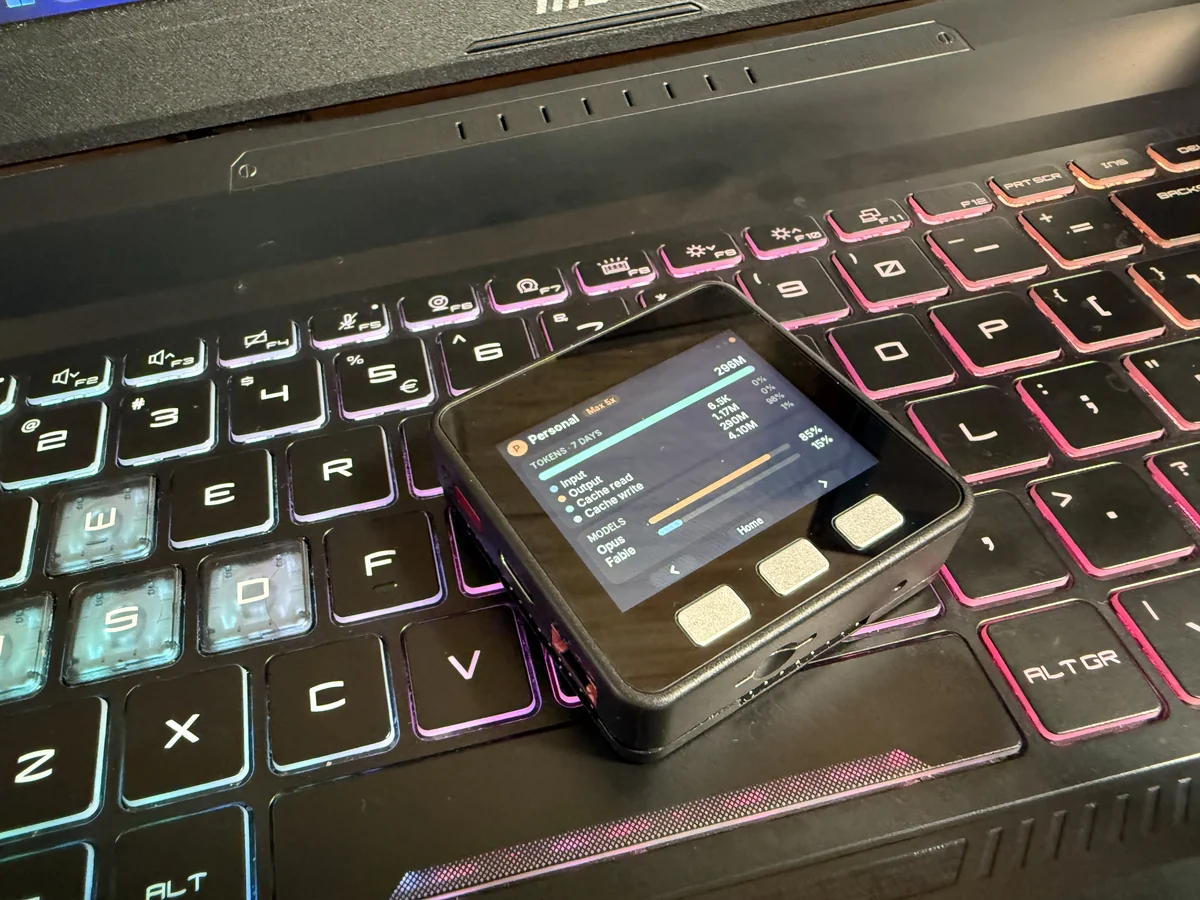
The dot next to the clock shows the link: green while data is fresh, amber when it is stale, red when no PC is connected. The photos show my own account. The screenshots use demo accounts.
Battery, sound and settings
Next to the clock is the battery, drawn the way phones draw it: the level, and a lightning bolt with a fill that climbs while it charges. The IP5306 power chip reports only four steps (25, 50, 75 and 100%), so the number moves in steps of 25.
The speaker is used for alerts. When a session or weekly limit crosses 90% (or 80%, if you choose), the device plays a short double chime and shows which account and which limit. When a limit resets, it plays a rising chime. Approval requests from a new computer also make a sound. Button clicks are optional.
Holding C opens the settings. A and C move, B changes a value, and holding B closes the screen. The settings are saved on the device.
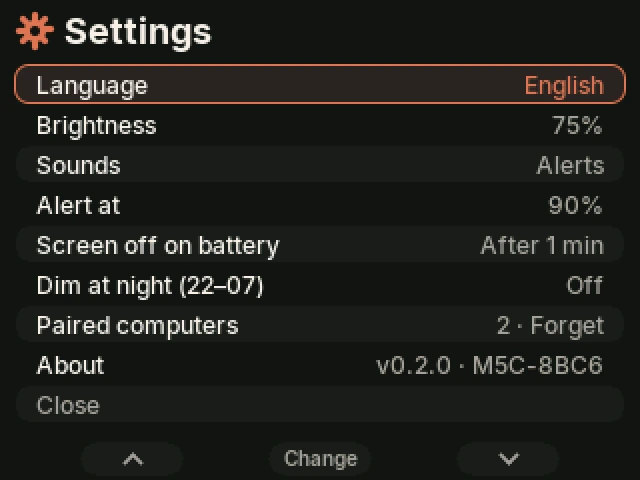
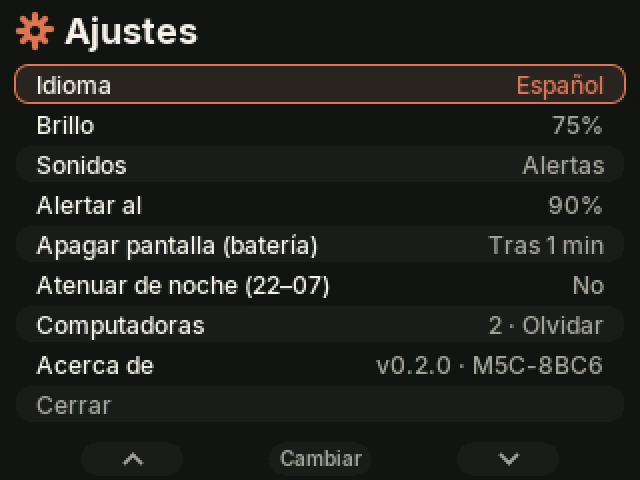
- Language. English or Spanish. Every string on the screen lives in one table, so adding a language is one more entry.
- Brightness. 25, 50, 75 or 100%.
- Sounds. Off, alerts only, or alerts and button clicks.
- Alert at. 80%, 90% or off.
- Screen off on battery. Never, after one minute or after five. Any button wakes it, and the press that wakes it does nothing else. With a 110 mAh battery, this matters.
- Dim at night. Lowers the backlight from 22:00 to 07:00, using the PC’s clock.
- Paired computers. How many are approved, and B forgets them after a confirmation.
Making 110 mAh last
The first firmware drained the battery in well under an hour. The CPU ran at 240 MHz, the screen repainted every second, and the radio transmitted at full power with a 15–30 ms connection interval. None of that is needed to show a number that changes once a minute. On battery, the firmware now does this:
- CPU at 80 MHz, the lowest speed Bluetooth supports. It returns to 240 MHz on USB power.
- Backlight: it dims after 20 seconds without a button press, and turns off after the time chosen in the settings.
- Standby: 15 seconds after the screen goes off, the radio shuts down and the ESP32 enters light sleep. RAM is kept, so any button brings the screen back at once with the last data, and the bridge reconnects within seconds. Every 10 minutes a timer wakes it for up to 45 seconds with the screen still off. It fetches fresh data, and if a limit crossed the alert threshold, it lights the screen and plays the alert.
- Radio: 0 dBm instead of +9, advertising every 0.5–1 s, and a 100–200 ms connection interval with slave latency. A 600-byte snapshot a minute needs little more.
- Repaints happen only when the minute changes or new data arrives, and there are no idle animations on battery.
For all-day use away from the desk, the Battery Module 13.2 stacks under the Basic and adds 1500 mAh.
How it works
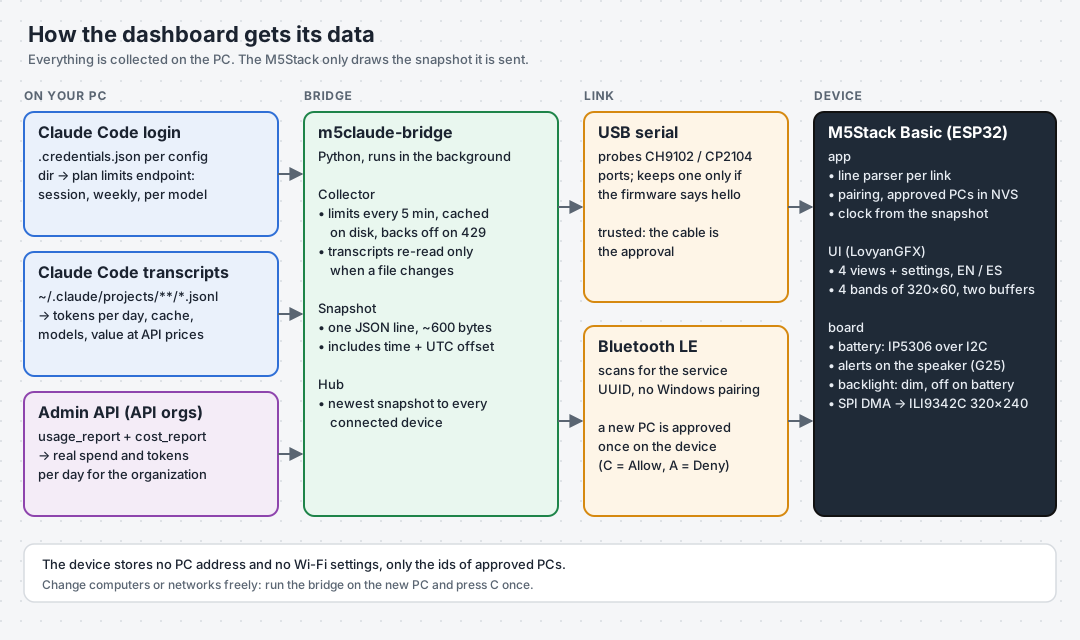
The design rule is that the device knows nothing. It holds no Claude credentials and no Wi-Fi settings. A small program on the PC, the bridge, collects everything and sends the device a snapshot to draw. That keeps secrets off a device that sits on a desk, and it means changing computers or networks needs no reconfiguration.
Where the data comes from
The bridge is about 1,100 lines of Python with two dependencies (pyserial and bleak). It reads three sources:
- Plan limits, from Claude Code’s login. Each Claude Code config directory (
~/.claude,~/.claude-work, …) holds the login of one account. The bridge finds them all and uses each token to read the same limits Claude Code’s/usagescreen shows. It only reads the token and never refreshes it, because refreshing would rotate the token and log Claude Code out. - Tokens, from Claude Code’s transcripts. Every response Claude Code receives is written to a JSONL file under
projects/, with its token usage and model. The bridge adds these up per day, removes duplicates (a resumed session copies earlier messages into a new file), and prices them with the API price list. - Spend for API organizations, from the Usage and Cost Admin API.
usage_report/messagesgives tokens per day and model.cost_reportgives the real spend. Both need an Admin API key (sk-ant-admin01-...).
Two lessons from running it against real accounts:
- The limits endpoint is rate limited. While I was testing, it started returning HTTP 429 with no
Retry-After. The bridge now reads limits every five minutes instead of every minute, keeps the last good answer on disk, and keeps showing it through temporary errors. Tokens still update every minute, because they come from local files. - Transcripts get large. Mine were 665 MB. The bridge reads only files changed in the last eight days and re-parses a file only when its size or modification time changes. A refresh takes about a second.
The snapshot
Every refresh produces one JSON line of about 600 bytes:
{"v":1,"ts":1792770195,"tz":3600,"acc":[
 {"n":"Personal","p":"Max 20x","k":"sub","ok":1,
  "s":[42,1792778235],"w":[67,1793037195],"x":[["Opus",54,1793037195],["Sonnet",31,1793037195]],
  "td":2840000,"tk":[2310000,1480000,15900000,1120000],"c":84.2,"ct":11.35,
"d":[1900000,3400000,2600000,4100000,3300000,2670000,2840000],"m":[["Opus",61],["Sonnet",34],["Haiku",5]]}]}s, w and x are the session, weekly and per-model limits as [percent, reset time]. d is tokens per day. ts and tz are the PC’s clock and UTC offset. The M5Stack Basic has no real-time clock and no time zone database, so the device takes both from the snapshot and counts seconds from there. That is enough for “resets in 2h 14m” and “Tue 04:00”.
Connecting without configuration
I wanted no setup at all. Typing a Wi-Fi password into a device with three buttons is unpleasant. Saving the PC’s IP address on the device breaks as soon as you change computers. So the device supports two links, and neither needs settings.
USB. Plug in the cable. The bridge looks for serial ports whose USB chip is an M5Stack’s (CH9102 or CP2104). It opens the port without toggling DTR and RTS, so the ESP32 does not reset, and waits for a greeting. The firmware sends {"hello":"m5claude",...} every two seconds until data arrives. If no greeting arrives within a few seconds, the bridge releases the port and leaves it alone for a while, so other ESP32 boards and flashing tools are not affected.
Bluetooth LE. The firmware advertises a GATT service with two characteristics: one the PC writes lines to, and one the device sends notifications on. The bridge scans for the service UUID and connects. There is no Windows pairing dialog, and nothing to choose from a list.
Since any computer in range could find the device, each new PC is approved once, on the device:
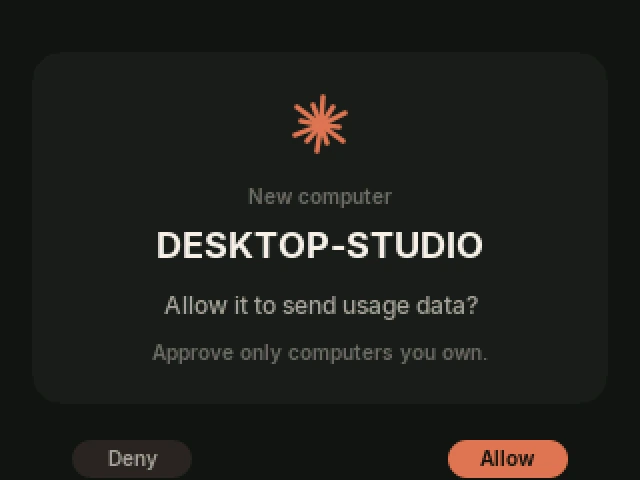
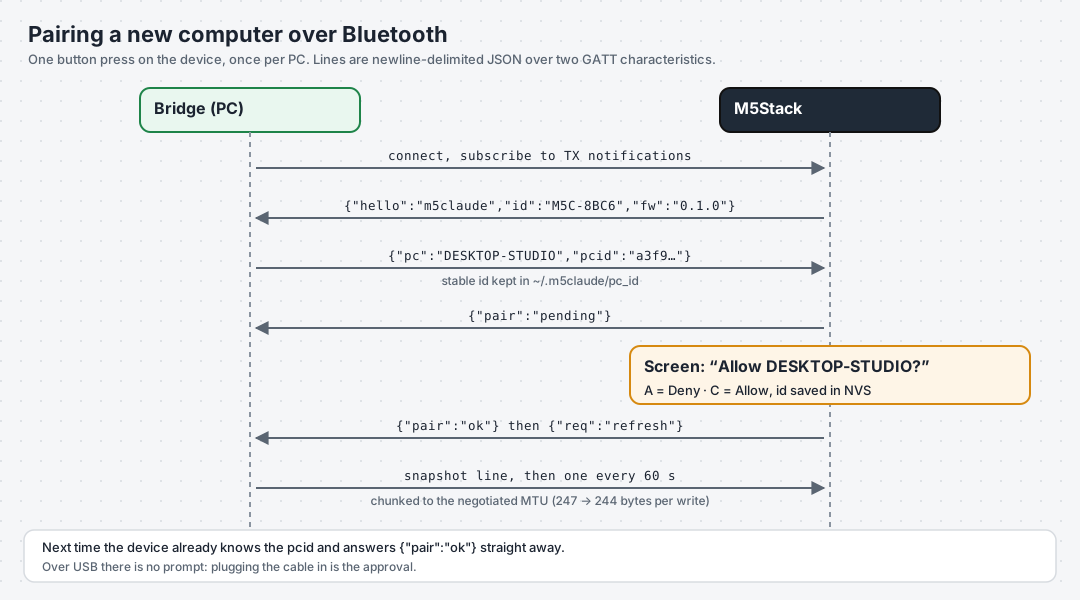
The bridge keeps a random id in ~/.m5claude/pc_id. The device stores the ids of up to four approved PCs in NVS. A known PC is accepted at once, and holding A while powering on forgets them all. A device that is already connected over USB is skipped on Bluetooth, so it is not asked to approve the same PC twice.
Until the bridge is running, the device shows what to do:
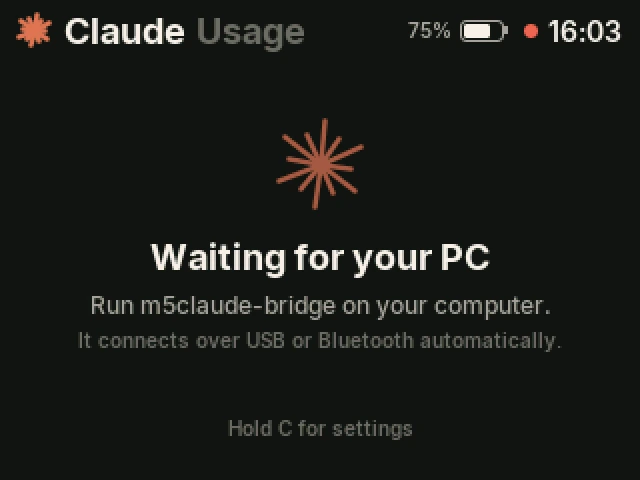
The firmware
The firmware is an Arduino sketch built with arduino-cli on the arduino-esp32 2.0 core. It uses three libraries:
- LovyanGFX to draw the screen.
- NimBLE-Arduino for Bluetooth. NimBLE uses about half the RAM of the default Bluedroid stack.
- ArduinoJson 7 to parse snapshots.
The UI code does not depend on the hardware. It draws into a LovyanGFX target and reads the three buttons. Everything specific to the board (the panel, USB, BLE, NVS) lives in the sketch.
Some details that make it look like a product rather than a demo:
- Anti-aliased text. The fonts are Inter, converted to LovyanGFX’s smooth VLW format by a small Python script at six sizes. The script includes only the characters each size uses, about 77 KB in total.
- Anti-aliased gauges. The rings are drawn per pixel: coverage is computed from the distance to the ring’s edges, and the ends are rounded. Bars and cards use LovyanGFX’s smooth rounded rectangles.
- Short animations. On every view change, bars and numbers grow to their values over half a second with an ease-out curve.
Drawing without PSRAM, and the diagonal streaks
A full 320×240 frame in 16-bit color is 150 KB. The ESP32’s largest free memory block, with Bluetooth running, is smaller than that. So the UI is drawn four times per frame into a 320×60 band (38 KB). Each pass draws everything shifted up by the band’s offset, and parts that fall outside the band are clipped.
The first time this ran on the board, the screen showed diagonal streaks, and the approval prompt’s buttons appeared twice, at the top and at the bottom. The panel configuration was my first suspect. I rewrote it by hand from M5Stack’s documentation, and nothing changed. The cause was elsewhere:
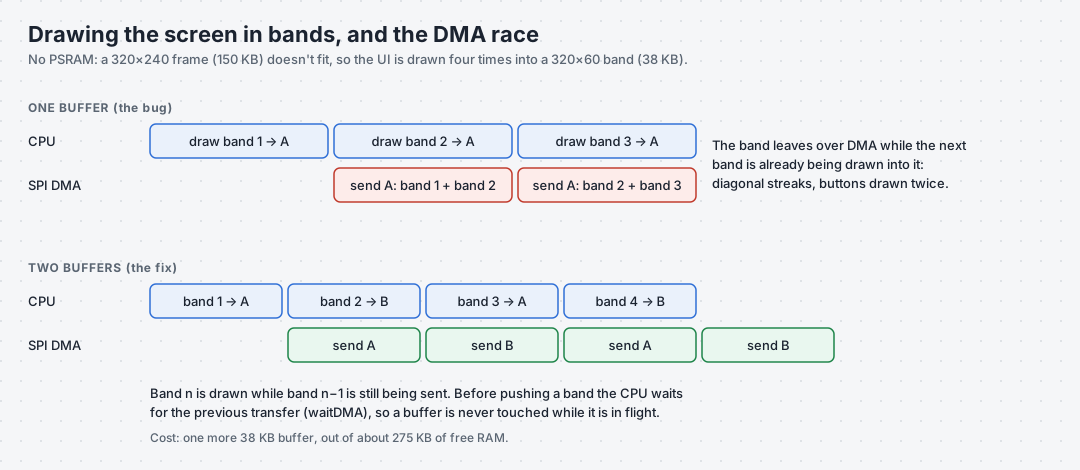
LovyanGFX sends a sprite to the panel with DMA, in the background. My loop started drawing the next band into the same buffer while the previous one was still being sent, so the panel received half of one band and half of the next. The fix uses two buffers in turn and waits for the previous transfer before pushing:
for (int y = 0, k = 0; y < 240; y += 60, k ^= 1) {
  LGFX_Sprite& band = bands[k];
  band.fillScreen(BG);
  draw_ui(band, /*offset_y=*/y);   // runs while the other buffer is still being sent
  lcd.waitDMA();                    // the other buffer's transfer has finished
  band.pushSprite(&lcd, 0, y);      // starts this buffer's transfer
}
lcd.waitDMA();
It costs one more 38 KB buffer, out of about 275 KB of free RAM.
The code, part by part
Download the code with git clone https://github.com/velxio/m5claude.git, or as a ZIP from the repository’s Code button. It has two halves that share nothing but the protocol: bridge/ runs on the PC, and firmware/ plus src/ run on the M5Stack.
On the M5Stack
firmware/m5claude/m5claude.ino: everything specific to the board.
- The panel configuration: ILI9342C on VSPI, its pins, rotation and color inversion.
- The USB link. It reads the serial port and writes replies.
- The Bluetooth link. It is a NimBLE GATT service with a characteristic the PC writes to and one the device notifies on. Bytes received in NimBLE’s callbacks go into a stream buffer and are processed in
loop(), so the rest of the code never runs on the Bluetooth task. - The list of approved PCs and the settings, kept in NVS with
Preferences. - The battery: every two seconds it reads the IP5306’s level, charging and charge-complete bits over I2C.
- The speaker: a small sequencer plays the alert, reset and pairing tones with LEDC square waves at a low duty cycle, then holds the pin low so the speaker doesn’t hiss between sounds.
src/app/app.cpp: the protocol, independent of the link.
- Every link (USB or Bluetooth) gets its own line buffer and state. It parses a line at each newline, and repeats the greeting every two seconds until data arrives.
- An untrusted link goes through approval: the device asks the UI, remembers the answer and replies
pair: okordenied. - It turns a long press of B into
{"req":"refresh"}. - It keeps a copy of the previous snapshot, so the UI can tell when a limit crossed the alert threshold or reset.
- It keeps the clock: the time of the last snapshot plus the seconds since it arrived.
src/model/: the data.
model.hdescribes an account: plan, limits as percent and reset time, tokens per day, cost, and models.parse.cppfills the model from a snapshot with ArduinoJson. It parses into a separate copy and replaces the current data only if the whole line is valid, so a corrupted line can never leave the screen half-updated.mock.cpphas the demo accounts used in this article’s screenshots, useful while designing.
src/ui/: the screens.
ui.cppdraws the four views, the settings and the approval prompt. It handles the buttons: a click, or a long press after 650 ms. It runs the half-second animations, decides the backlight level (chosen brightness, night dimming, off when idle on battery), raises the limit alerts, and renders in bands with two DMA buffers.i18n.hholds every string on the screen, in English and Spanish, including the weekday names and the bridge’s error messages.gfx.hholds the colors and the drawing helpers: rounded bars, the anti-aliased ring, and the offset that lets the same drawing code fill any band.fonts_gen.hcontains the Inter fonts. They are generated bytools/make_fonts.py.
On the PC
The bridge lives in bridge/m5claude_bridge/. Its only dependencies are pyserial and bleak. HTTPS calls use the standard library.
__main__.py: the command line and the main loop.
- The commands are
run,snapshot,accounts,init,add-apiandautostart. - Before running, it takes a lock (a listening socket on localhost), so only one bridge runs at a time.
runcollects a snapshot every 60 seconds, or immediately when a device asks for one, and hands it to the hub.
autostart.py registers the bridge to start at login without a window: the Run registry key with pythonw on Windows, a LaunchAgent on macOS, a systemd user unit on Linux.
config.py: the accounts.
- It detects every Claude Code config directory with a login.
- Alternatively, it reads
~/.m5claude/config.json, where you can name accounts and add API organizations.
sources/: one file per data source.
subscription.pyreads an account’s Claude Code login and its plan limits.local_logs.pyreads Claude Code’s transcripts. It parses incrementally, removes duplicate messages, and totals tokens per day and per model.admin_api.pyreads the Usage and Cost Admin API for API organizations, following pagination.
pricing.py holds API list prices per model family. It estimates the value of subscription usage.
snapshot.py: builds the snapshot.
- It collects every account in parallel, so one slow account does not delay the rest.
- It applies the limits policy: every five minutes, with the last good answer cached on disk and kept through temporary errors.
hub.py keeps the newest snapshot and gives it to every connected device. A slow link gets only the latest one, never a backlog.
transports/: one file per link.
usb_serial.pyfinds M5Stack USB chips and keeps a port only if the firmware greets it.ble.pyscans, connects, waits for approval, and writes in chunks that fit the negotiated MTU.tcp.pyis a local link for development.
The repository’s README has the same tour as tables, plus troubleshooting.
Build your own
The order I recommend: design the screens in Velxio, then flash the board, then connect the bridge.
1. Run it and change it on the M5Stack Core in Velxio
Velxio simulates the M5Stack Core with its 320×240 screen, the A, B and C buttons and the battery chip. Laying out a 2-inch screen is a lot of small adjustments (a label two pixels too low, a number that doesn’t fit its card), and each one takes seconds in the browser instead of a flash cycle.
The dashboard is in Velxio’s example gallery, with the same source files as the repository:
- Open M5Stack Core: Claude usage dashboard (m5claude) and click the play button. No sign-up is needed. It starts on the demo accounts from this article.
- Click A and C to pick an account and B to step through the views. The simulator runs the firmware slower than the board, so to open the settings, hold C for a few seconds.
- To see your own numbers, run
m5claude-bridge snapshoton your PC and paste the line it prints into the serial monitor. The first comment in the sketch has a sample line you can edit. - Change the screens in
ui.cppand run again. When they look right, flash the board.
Two things differ from the board: Velxio has no Bluetooth, so that link is left out and the serial monitor is the only link, and the speaker code uses the newer ESP32 Arduino core’s calls. Each change is marked in the sketch.
To start a dashboard of your own from an empty screen, M5Stack Core: Hello LCD + Buttons is the smallest example. It uses M5Stack’s M5GFX, which is built on LovyanGFX and shares its drawing API, so code moves between the two.
2. Flash the firmware
git clone https://github.com/velxio/m5claude.git && cd m5claude
arduino-cli core install esp32:esp32
arduino-cli lib install LovyanGFX NimBLE-Arduino ArduinoJson

./firmware/build.sh /dev/ttyUSB0      # Linux / macOS
.\firmware\build.ps1 -Upload          # Windows, finds the COM port by itself
The scripts build for the M5Stack Core with a partition scheme that leaves room for a large app (PartitionScheme=no_ota). The firmware is about 820 KB. Two settings caught me out:
- C++17. The arduino-esp32 2.0 core compiles as C++11 by default, and the code uses C++14 and C++17 features. Add
--build-property "compiler.cpp.extra_flags=-std=gnu++17". - The panel. I configure the ILI9342C explicitly (VSPI, MOSI 23, MISO 19, SCK 18, CS 14, DC 27, RST 33, backlight 32,
offset_rotation = 3) instead of using LovyanGFX’s board autodetection. The v2.7’s IPS panel needs inverted colors. It is detected the same way M5Stack’s own libraries do it: through how the reset line reads back.
3. Run the bridge
pip install -e bridge                # from the repository root; installs pyserial and bleak
m5claude-bridge accounts             # which accounts it found
m5claude-bridge autostart on         # start now, and at every login
autostart on registers the bridge to start when you log in, with no window. On Windows it adds a value under the user’s Run registry key that launches pythonw. On macOS it installs a LaunchAgent, and on Linux a systemd user service. autostart status shows whether it is running and the last lines of its log, in ~/.m5claude/bridge.log. Only one bridge runs at a time: a second one would compete for the USB port and the Bluetooth connection, so it exits with a message. Running m5claude-bridge on its own keeps it in the foreground, with the log in the terminal.
Pro and Max accounts are found from Claude Code’s config directories. To add a second subscription, log it in under its own directory:
$env:CLAUDE_CONFIG_DIR = "$HOME\.claude-work"; claude # then /loginAPI organizations need an Admin API key, from the Claude Console under Settings → Admin keys:
m5claude-bridge add-api "Acme API" --key-env ACME_ADMIN_KEY4. Connect
Plug in the USB cable, or leave the device on the desk and let Bluetooth find it. The first time over Bluetooth, press C on the device to approve the PC. Data appears within a few seconds.
Caveats
- The plan limits endpoint is not a public API. It is the endpoint Claude Code’s
/usagescreen uses, and it could change. The bridge falls back to older field names, but a format change would need an update. - Logins expire. Claude Code refreshes its token when you use it. An account you have not used for a few hours shows “Login expired” until Claude Code runs with it again.
- The dollar figure for subscriptions is an estimate at API list prices. API organizations show their real spend from the cost report.
What’s next
- A tray icon on the PC showing the link state.
- A history on the microSD card, for charts longer than seven days.
- An RGB LED on the Grove port that turns red past 90%, visible from across the room.
- An optional Wi-Fi link, configured from the bridge over USB or Bluetooth, so the device can sit in another room.
The code is at github.com/velxio/m5claude. Issues and pull requests are welcome.
Thanks to M5Stack for a board that is ready to use out of the box, and to the authors of LovyanGFX, NimBLE-Arduino, ArduinoJson and bleak.
Links to the M5Stack store on this page are affiliate links: if you buy through them, Velxio earns a small commission at no extra cost to you, and it helps keep the simulator free.