Most desk gadgets show information. I wanted one that reacts to people: a robot that looks at you when you speak, answers you, and does something amusing when nobody is around. The Espressif ESP-VoCat v1.2 has the hardware for that. It combines an ESP32-S3 SoC, a round 360×360 touch screen, two microphones, a speaker and a battery in a case with cat ears.
VoCat Eyes is the face I wrote for it, and the first robot of a series called Cute Desktop Robot. Its main features are:
- 56 facial expressions and 47 short animations
- A small state machine that decides what the robot does: play, react, get bored, fall asleep
- Eyes that turn toward the person who is speaking
- Spoken conversations through the Gemini Live API, started with the wake word “Hi ESP” or a tap
- Wi-Fi, volume, brightness and voice settings on the robot’s own screen
- An emulator that runs the same code on a PC and in this page
The firmware, the emulator and the tools are open source in the cute-desktop-robot repository.
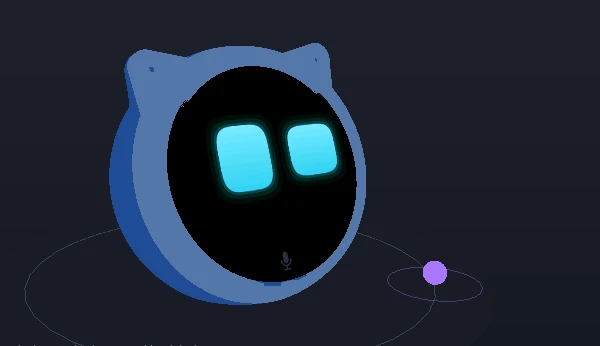
The image above is the emulator’s 3D view: the enclosure model that Espressif published, with the live screen of the emulated robot inside it.
And this is the real robot on a desk, running the same firmware:
The robot on the real hardware: watch it on YouTube.
Try the robot in your browser
The emulator below runs the robot’s C++ code compiled to WebAssembly: the same face engine, state machine and screens that run on the ESP32-S3. Only the hardware layer is replaced by simulated parts. It needs no account and no installation. Only the voice conversation needs the real robot, because the emulator has no network.
If the frame is too small, open the emulator in a full window.
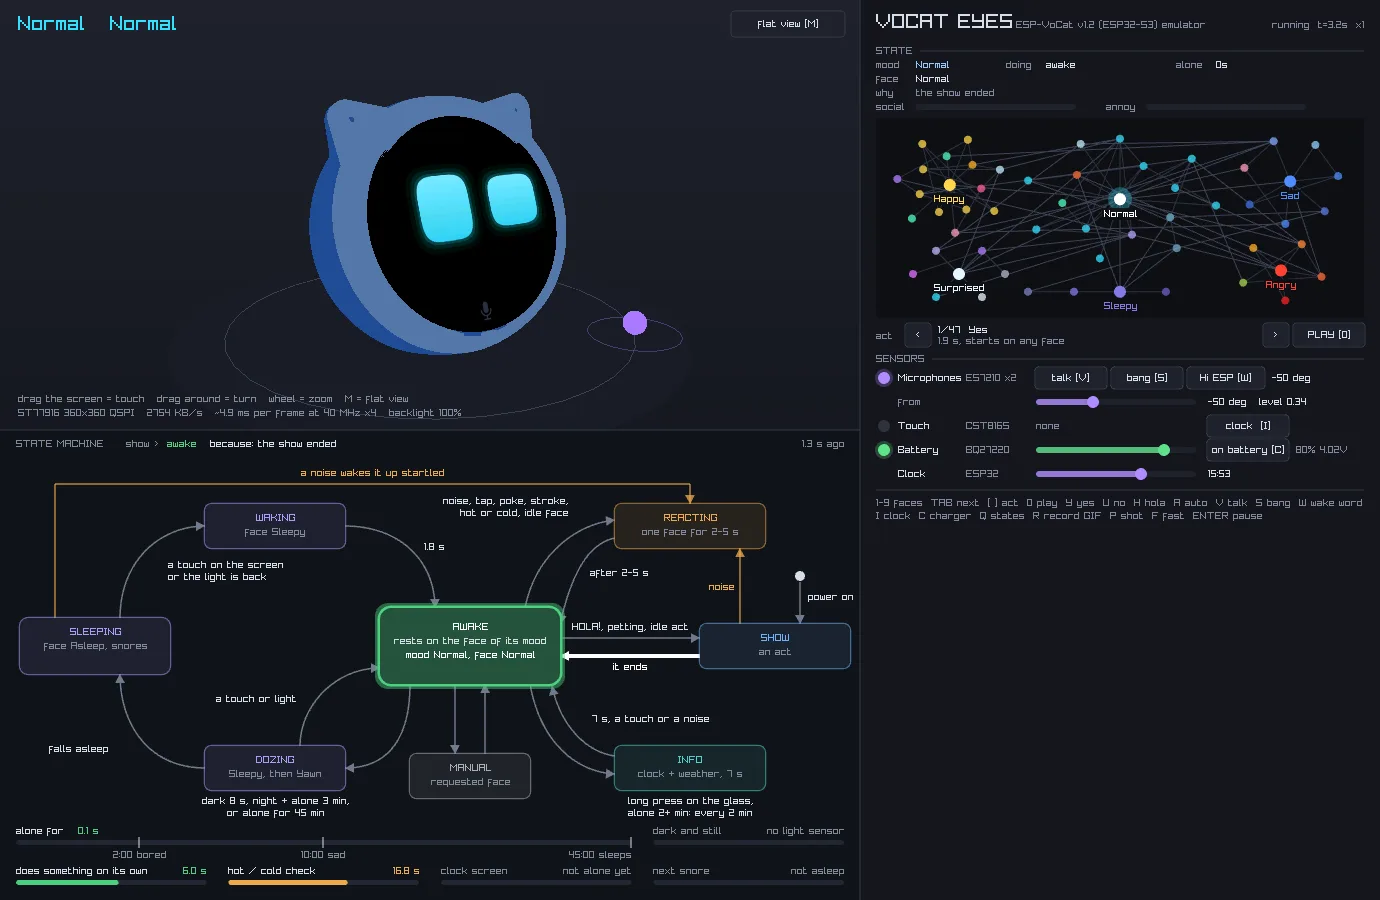
The window has three parts. On the left is the robot in 3D, below it is the state machine, and on the right is a panel with the emotion graph and the sensors. To try it:
- Tap the robot’s screen. Click once on the round screen of the 3D robot. The robot plays its next animation.
- Open the settings. Click and hold on the screen until the clock and battery appear, then click once on the clock. A settings menu opens. Click the left half of a row to lower a value and the right half to raise it. Click and hold to close the menu.
- Speak from one side. In the right-hand panel, under SENSORS, drag the slider next to from to an angle, then click talk [V]. A purple dot on the floor shows where the simulated voice comes from, and the robot’s eyes turn toward it.
- Watch the state machine. Each time the robot changes its activity, the matching box lights up in the state machine, and the bars at the bottom show the timers that can change it next.
- Turn the robot. Drag anywhere outside the screen to rotate the 3D view, and use the mouse wheel to zoom. Press
Mto switch to a flat view of the screen.
The keyboard also works once you click the emulator: 1 to 9 show expressions, Y nods, U shakes the head, and H shows a speech balloon. The tap and the settings work the same way on the real robot.
The next screenshot shows the whole emulator window as it looks on a desktop PC:
The hardware
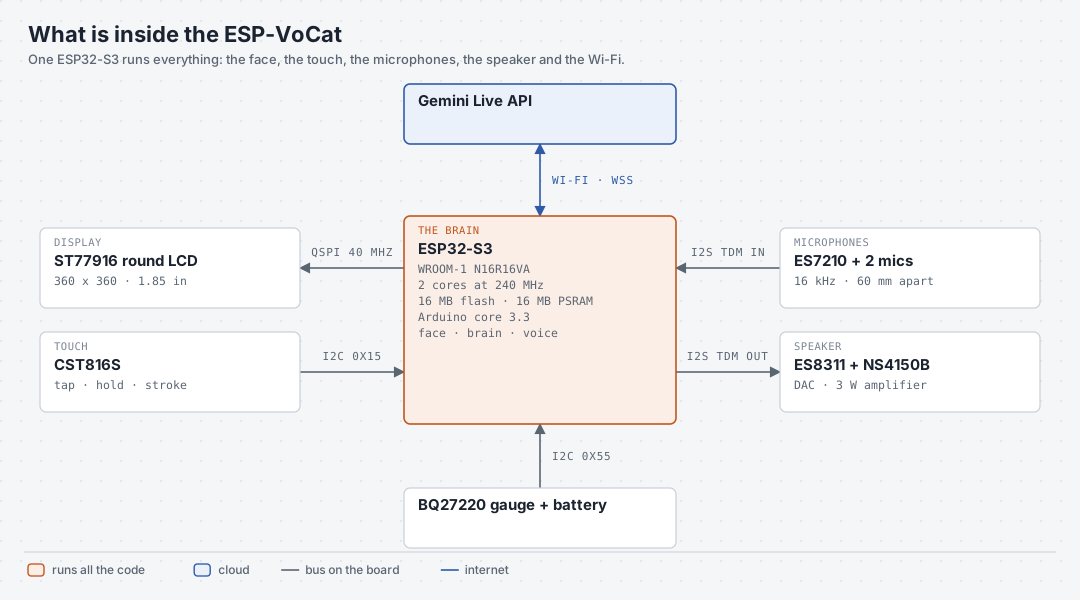
The ESP-VoCat comes assembled, with the case, battery and screen in place. The ESP-VoCat user guide describes the board in detail. One ESP32-S3 module does all the work. It has 16 MB of flash memory and 16 MB of PSRAM (external RAM). The PSRAM makes a 360×360 face possible: one full frame in 16-bit colour takes 253 KB, more than the SoC’s internal RAM can hold.
The following diagram shows the parts the firmware uses and the bus that connects each one to the ESP32-S3:
Two parts needed extra work:
- The screen turned on its backlight but stayed black. The initialization sequence I adapted from the vendor driver was missing two final commands: the pixel format (
0x3A) and display on (0x29). - The microphones returned only zeros at first. The microphone ADC (ES7210) and the speaker DAC (ES8311) share the same I2S clock lines. The I2S bus therefore has to use the same frame format in both directions: TDM (time-division multiplexing) with four 16-bit slots. With that change, the two microphones appear in slots 0 and 2, and slot 1 carries a copy of the speaker signal for echo reference.
How the robot draws its face
The robot redraws its face every 33 ms, about 30 times per second. The diagram below follows one of those frames from the sensors to the screen:
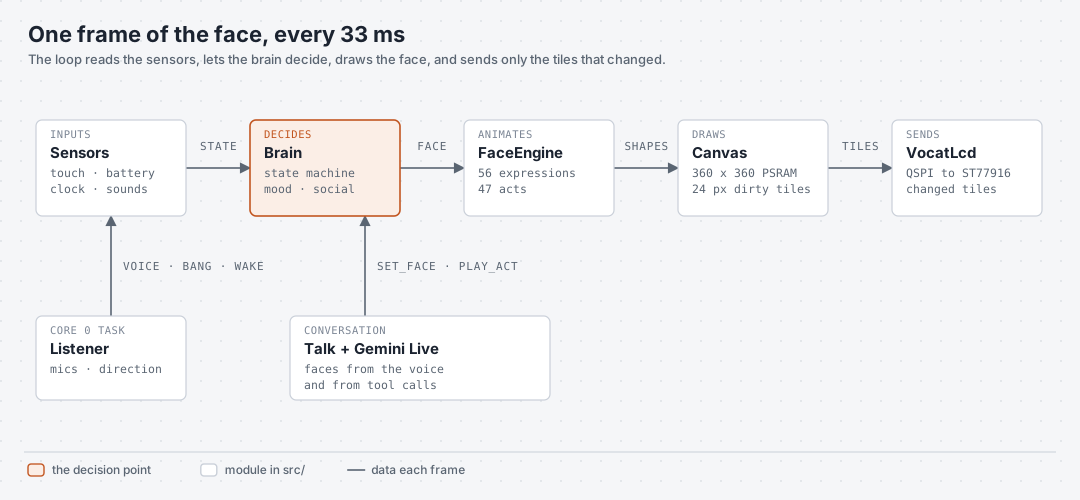
Each block in the diagram is one module of the firmware:
- Sensors collects touches, the battery level, the time and sound events into one structure.
- Brain is a state machine with the states awake, show, reacting, dozing, sleeping, info and manual. Each state leaves on specific events, such as a touch, a loud noise, the time of day or a long time alone. The Brain also tracks slow moods: a robot that is often petted drifts toward happy faces, and one that is poked too often becomes annoyed.
- FaceEngine moves between expressions along a graph. The 56 expressions are its nodes, and a change of face follows the shortest path, so the robot goes from happy to sad through intermediate faces. Each eye is described by a few parameters, such as size, corner radius, slope, eyelids and colour, and the engine interpolates them.
- Canvas draws the frame in PSRAM and records which 24×24 tiles changed. A blink changes a few tiles, so the display bus sends a few kilobytes instead of the full 253 KB.
- VocatLcd sends the changed tiles to the ST77916 display over QSPI (a four-line SPI bus).
All the expressions and animations
The emulator includes a command-line tool, facetool, that renders the robot’s screen without opening a window. The videos below come from it. Each one plays all the faces of a group at the same time: first the change into each face, then the face itself.
Expressions
Calm and thinking (16): normal, curious, focused, skeptical, bored, confused and listening, among others.
Happy (15): from a small smile to laughing, love and starstruck.
Sad (8): worried, pleading, crying, lonely and guilty, among others.
Angry (6): from annoyed to furious, and disgust.
Surprised and alert (7): surprised, scared, dizzy, knocked out and hypnotised, among others.
Sleepy (4): sleepy, yawning, asleep and tired.
Animations
Animations, called acts in the code, are short scenes, many with an object drawn next to the eyes: a rain cloud, a coffee cup, a radar screen. The Brain plays them when the robot is idle, and a tap on the screen plays the next one.
Body language (9): nodding, shaking the head, rolling the eyes, sneezing.
Screen effects (5): a glitch, a reboot, a scanner line, falling code.
With objects (18): hearts, rain, fireworks, bubbles, a ball, dancing.
Everyday things (9): a book, headphones, coffee, a rocket, snow.
Games and round-screen effects (6): Pac-Man, Pong, a rainbow, a radar, an aquarium.
The same grids, as animated GIFs, are in the repository README.
How the robot talks
The conversation uses the Gemini Live API, which receives a stream of audio and answers with a stream of audio over one WebSocket connection. At the time of writing, the robot uses the gemini-2.5-flash-native-audio model. The diagram below shows the path of the audio:
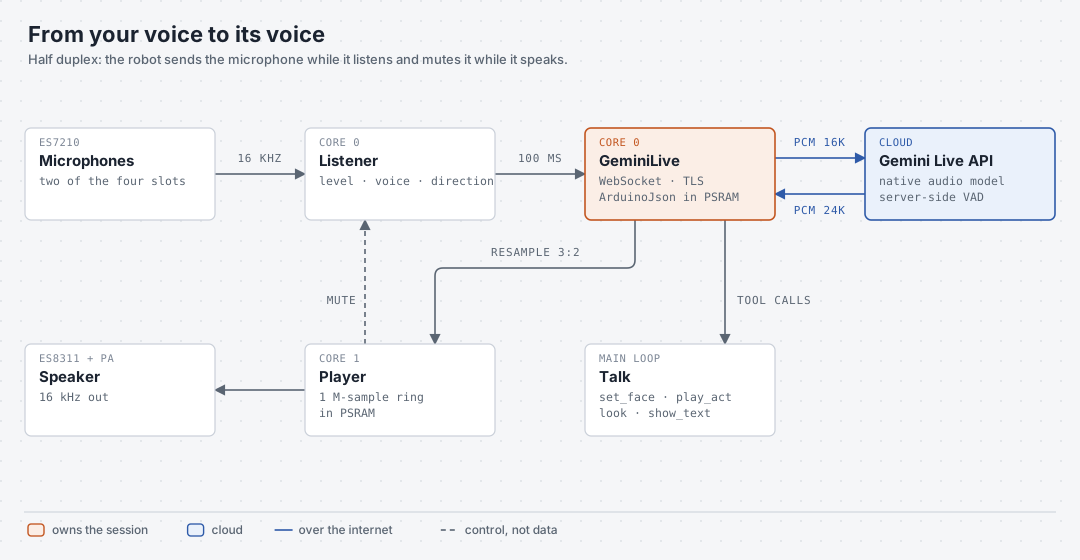
The robot sends the sound of one microphone as 16 kHz PCM audio, in chunks of 100 ms. Gemini answers with 24 kHz speech, which the robot converts to 16 kHz and plays.
The conversation is half duplex: the robot either listens or speaks, never both at once. The speaker sits a few centimetres from the microphones, so the robot mutes the microphone stream while it plays an answer. Otherwise Gemini would hear its own voice. Gemini decides on its side when the person has finished speaking.
Gemini also receives four tools, functions that it can call during the conversation: set_face, play_act, look and show_text. When the conversation turns sad, Gemini can call set_face("sad"). When you ask the robot to agree, it can call play_act("yes") and the robot nods. Each session starts with a short text message that contains the local time and date, so Gemini can answer questions about them.
Three problems took most of the development time:
- The secure connection. The robot connects to Gemini over TLS. The
setInsecure()function of the ArduinoWebsockets library has no effect on the ESP32-S3, so the TLS handshake failed. The firmware now includes Google’s two root certificates (GTS Root R1 and R4, valid until 2036). It also waits for the clock to synchronise over NTP, because checking a certificate needs the current date. - Internal RAM. The “Hi ESP” wake word runs on ESP-SR, the Espressif speech recognition library, which keeps about 100 KB of internal RAM. The TLS library needs internal RAM for the handshake, and the first attempts failed with
SSL - Memory allocation failed. The robot now stops ESP-SR when a conversation starts, which frees 107 KB, and loads it again when the conversation ends. Loading ESP-SR takes about 1.2 seconds. - The missing microphone stream. For one day, the robot greeted the user and then ignored everything that followed. Its eyes still followed my voice, so the microphones clearly worked. The cause was that the firmware never enabled the audio stream to Gemini. The serial console now prints Gemini’s transcription of what it heard, so the same problem would be visible at once.
Using Gemini needs an API key from Google AI Studio, and the API is billed per use according to Google’s Gemini API pricing. The key stays in a local secrets.h file that is never committed to the repository.
Settings on the robot’s screen
The robot needs no computer once it is set up. A long press on the screen shows the clock, the battery level and the Wi-Fi state. A tap on the clock opens the settings, where you can change:
- Volume and screen brightness
- Gemini’s voice, from eight voices
- The “Hi ESP” wake word, on or off
- The sounds that accompany the expressions
- Whether the robot plays and sleeps on its own
- How many seconds of silence end a conversation
The Wi-Fi row opens a list of the networks in range and an on-screen keyboard with capital letters, numbers and symbols. The ESP32-S3 cannot scan for networks while it is connecting to one, so the firmware pauses the connection attempts during the scan and resumes them afterwards. If the password is wrong, the clock screen shows that as the reason. The ESP32-S3 only supports 2.4 GHz networks.
One code base for the robot, the PC and the browser
The robot’s code does not call the display, touch or audio drivers directly. The face, the Brain and the screens go through a thin hardware layer in src/hw and src/audio. The emulator replaces that layer, so the rest of the code builds unchanged for three targets:
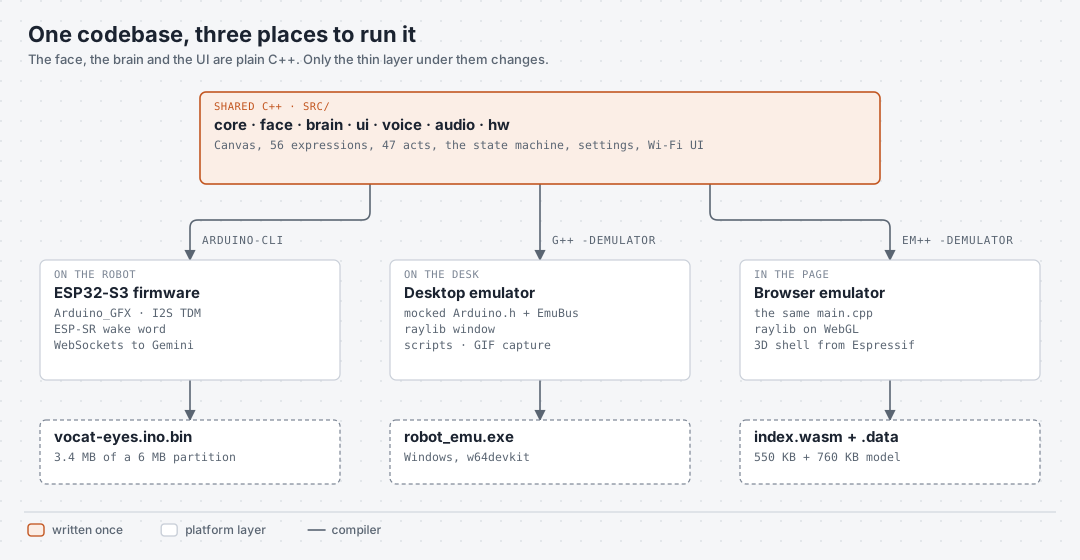
In the emulator, small replacement versions of Arduino.h, Wire.h and SPI.h write into a structure that stands in for the hardware. It holds the display memory, the touch controller registers and the battery readings. The emulator window, written with the raylib graphics library, draws that structure and lets you change the sensor values.
The browser version is the same emulator program compiled with Emscripten, which turns C++ into WebAssembly. Three changes made that possible:
- raylib for the web. raylib builds with Emscripten into a static library that draws through WebGL.
- One frame per call. The desktop version ran in an endless loop. That loop became a function that draws one frame. The desktop version calls it in a loop, and the browser calls it once per screen refresh.
- A fixed window size. In the browser, the emulator draws into a 1380×900 canvas, and the page scales the canvas to fit. A resizable canvas broke the mapping between mouse and canvas coordinates.
The 3D enclosure comes from Espressif. ESP-College published the ESP-VoCat (EchoEar) case as STL files on OSHWHub under the GPL-3.0 license. A short Python script converts the STL files into one 3D model file and reduces its detail so that the browser loads it quickly. The emulator draws the live screen onto a disc in the round window of the case. When you click the 3D screen, the emulator finds the clicked point on that disc and turns it into a touch at the matching pixel.
Build your own
To build VoCat Eyes you need an ESP-VoCat v1.2 board and, at the time of writing, version 3.3 of the Arduino core for ESP32. The VoCat Eyes README lists the libraries and the exact commands. In short:
- Copy
secrets.example.htosecrets.hand add your Gemini API key. You can also enter the Wi-Fi network there, or set it later on the robot. - Compile the sketch with the
esp_sr_16partition scheme and thepartitions.csvfile in the sketch folder. This layout gives the application 6 MB of flash. - Upload the firmware together with
srmodels.bin, the model file for the “Hi ESP” wake word. - On the robot, press and hold the screen, tap the clock, choose Wi-Fi, select your network and type its password.
- Say “Hi ESP”, or tap the small microphone at the bottom of the screen, and start talking.
If you are designing firmware for the ESP32-S3 or other boards, Velxio can simulate it in the browser before you flash any hardware.