
CI quickstart
You need a Velxio account on a paid plan and a compiled firmware file. The
simulator never compiles anything here: bring the .hex, .bin, .uf2 or
.elf your own toolchain produced.
1. Install the CLI
Section titled “1. Install the CLI”curl -fsSL https://velxio.dev/ci/install.sh | shIt drops a single binary in ~/.velxio/bin and tells you how to add it to
your PATH. Windows: iwr https://velxio.dev/ci/install.ps1 -useb | iex.
The binaries live on the releases page
if you prefer to fetch one yourself.
2. Sign in
Section titled “2. Sign in”velxio-cli loginIt prints a short code, opens your browser and waits. Approve the request and the CLI stores what it is given, so you never handle a token on your own machine.
code 7XJ6-33M5approve https://velxio.dev/account/ci/device?code=7XJ6-33M5waiting for approval of 7XJ6-33M5 (the code expires in 10 min)signed in as velxio-cli on laptopThe page shows what is asking, from which machine and for what, before you approve anything:
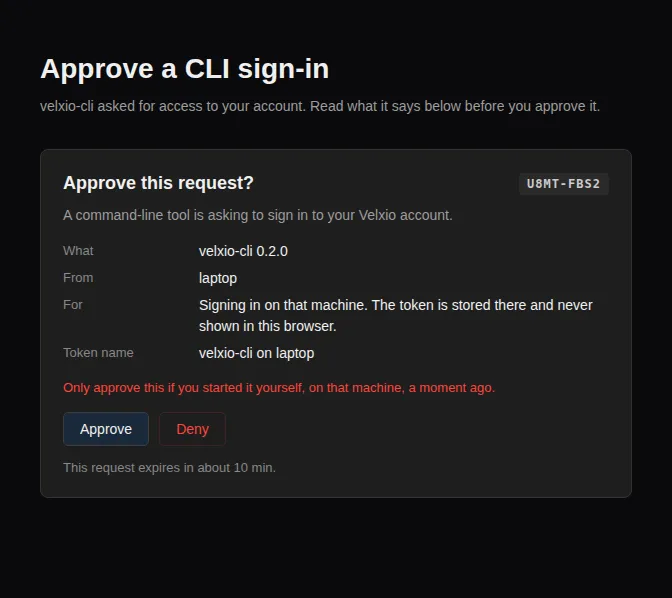
A CI job has no browser, so it carries one secret instead. The same flow mints it, named after the repository that will hold it:
velxio-cli login --ci --name "my-firmware"That one prints the token once. Store it as a repository secret (in GitHub: Settings, Secrets and variables, Actions) and never in the repository itself. Both kinds appear at velxio.dev/account/ci, where you can revoke either.
3. Describe the project
Section titled “3. Describe the project”Two files next to your firmware. velxio-cli init writes a starting pair, or
write them by hand:
[velxio]version = 1board = "esp32-s3"firmware = "build/blink.bin"{ "version": 1, "parts": [ { "type": "board-esp32-s3-devkitc-1", "id": "esp", "top": 0, "left": 0 }, { "type": "wokwi-led", "id": "led1", "top": 0, "left": 120, "attrs": { "color": "red" } }, { "type": "wokwi-resistor", "id": "r1", "top": 60, "left": 60, "attrs": { "value": "220" } } ], "connections": [ ["esp:2", "r1:1", "green", []], ["r1:2", "led1:A", "green", []], ["led1:C", "esp:GND.1", "black", []] ]}That is Wokwi’s diagram.json format, so an existing diagram works as it is.
4. Run it
Section titled “4. Run it”velxio-cli run --expect-text "Hello, world!" --timeout 10000 .The firmware boots, the serial output appears as it happens, and the command exits 0 as soon as the text shows up, or 42 when the ten simulated seconds run out without it.
velxio-cli 0.2.1 · plan pro · 1998.3 of 2000 min left (resets 2026-10-01)project blink (esp32-s3, 3 parts) · firmware build/blink.bin (ESP32 image, 912 KB)run r_9f3c2a1b7e4d queued · budget 10.0 s simulatedHello, world!ok wait-serial "Hello, world!" at 0.412 sPASS in 0.41 s simulated (3.2 s wall) · billed 1 s · exit 05. Put it in CI
Section titled “5. Put it in CI”- name: Test with Velxio uses: velxio/velxio-ci-action@v1 with: token: ${{ secrets.VELXIO_CLI_TOKEN }} path: firmware/blink timeout: 10000 expect_text: "Hello, world!"Compile in an earlier step; this one only runs what you built.
When it does not work
Section titled “When it does not work”exit 2before anything ran. A configuration problem: the board is not one Velxio runs, the firmware does not match the board, or the scenario has a step naming a part your diagram does not have. Nothing was billed.velxio-cli lint .finds most of these with no token and no network.exit 3. The token is missing, revoked or belongs to a plan without CI.exit 4. No minutes left this month, or more jobs at once than your plan runs.- The text never arrives. Raise
--timeout, then run without any expectation (velxio-cli run --timeout 5000 .) to read what the firmware actually prints.